October 24, 2011

Pinkilicious Birthday Shirts

A few weeks ago my friend Sheena shared an image with me of a "Pinkilicious" shirt. She seems to have much faith in my crafty skills because she asked me to create something similar for her daugher's birthday. As she has two girls very close in age we decided that both girls would need a shirt. So, here is what I came up with.

Photobucket
This is the shirt for the birthday girl Addison

Photobucket
For the birthday girl's sister-Reese

Each shirt used glitter HTV for the name and the bottom of the cupcake. I used a font on my computer and SCAL to do the names, for the base of the cupcakes I used the Sweet Treats Cricut Cartridge. For the top of the cupcakes I used rose ribbon purchased by the yard at Hobby Lobby.

Photobucket
Here is a photo of the flower ribbon. I pinned this on, the used my sewing machine to tack it in place. For the cherry, I started with an iron on cherry that I found at Joann. However, the cherry was just too plain so I used some fabric glue, sequins, and glitter to jazz the cherries up. Because I am not sure how the cherries will hold up in the wash I decided to put the cherries on pin backing to make sure that they can be removed before washing.

Photobucket
Cherries, before and after


Photobucket

Photobucket

Photobucket

Photobucket

Photobucket

Photobucket

Photobucket
HTV applied to the shirt.

Photobucket

Photobucket

Photobucket

October 17, 2011

Test tube share

have you seen all of the wonderful projects this season using test tubes as candy holders? I have and I think they are adorable. The only problem is that the test tubes are pricey, and not easy to find locally. As many of you know I am in school working towards a nursing degree, and because of that I spend a lot of time in science labs. Do you know what we use on a regular basis? TEST TUBES. So, I have asked around and found a very reputable company that offers food grade tubes. The best pricing is available to those who order in bulk. This is where the SHARE COMES IN. By splitting the order I can get a great price for myself and share that discount with you all! I have broken down the cost below, if you have any questions please email me at createdbymissie@aol.com or leave me a message here.


Would anyone be interested in doing a test tube share? I am thinking of ordering some, but they are much more affordable when ordered in bulk. Of course I know that I can't use extrememly large amounts of the tubes. I can figure out a price based on the number that I would need to order. I am initially thinking of doing 10, 25, and 50 tube lots. Let me know what you think.


So, anyone interested?
How many would you be interested in purchasing?


Here is the preliminary breakdown of prices...
Small candy tubes (15mm inside diameter)- perfect for small candies
Photobucket

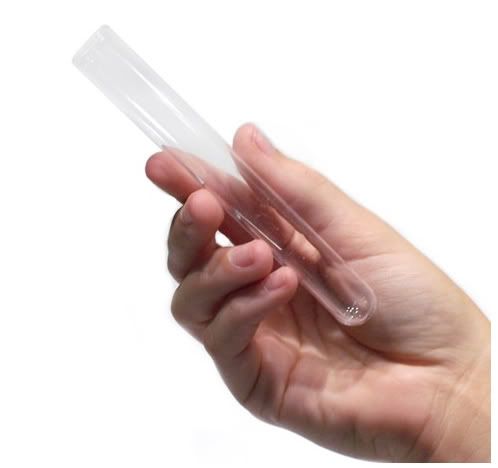
25 tubes with lids for $10.00 plus shipping
50 tubes with lids for $15.00 plus shipping
100 tubes with lids for $25.00 plus shipping

JUMBO Tubes with lids (approximate measurement 25mm, about 1 inch)- perfect for larger items
Photobucket
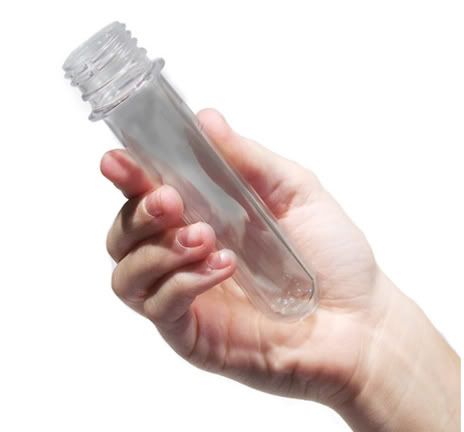
10 tubes with lids for $15.00 plus shipping
25 tubes with lids for $25.00 plus shipping


I am GUESSING that the tubes will fit in medium flat rate boxes for $10.95. If you would like larger quantaties of tubes a large flat rate box will be required for $14.95.

For this share to work we will need at least 10 participants (at the smallest quantaties). To participate please send an EMAIL to me at createdbymissie@aol.com with the number of tubes you would like and I will get you on the list. I will place the order as soon as we have the required number of participants who have paid (PAYPAL ONLY).

October 15, 2011

Robot Birthday Card

Today my boys and I are attending a birthday party for a friend of the family.  Here is the card I made for him!


The  card base was created using my Gypsy so that the Robot hangs off the edge of the front.  You can see this a little better when he is open.  I used a metalic silver paper for the base of the robot and embossed him with my CB and the diamond plate folder.  I love this folder and wish that PC would create another one just like it with the pattern a bit smaller.  That would be wonderful for use with cuts!  I used googlie eyes instead of the cuts because I really love the dimension.  For the body I used the window layer, and made it into a shaker card.  My friend Janice over at Craft Place makes shaker cards all the time & she has totally inspired me to try working them into my projects!  So when I saw the chance with this card I decided to take the plunge. 

The box is filled with micro beads, tinsel glitter, and some chunky blue glitter.


The front from the inside.  Here you can see the shape of the card


A card within a card.  I cut the window feature again, but larger and without the center cut out to create a "card" for on the inside.  I stamped "Happy Birthday" with a CTMH stamp and ink. 

Inside the inside card I attached a gift card.  The card came with this cute little window envelope.  I simply punched a small hole in the actual card with my big bite and attached a ribbon so that the gift card can easily slide in and out of the window card. 

I hope Devin enjoys the card as much as I enjoyed making it!  Thanks for stopping by!

October 14, 2011

BLOGIVERSARY: Circle Cartridge Challenge


Thank you card FRONT

This week over at the cricut circle blog there are a ton of contests running to celebrate the 1 year anniversary of the circle blog.  I had high hopes that I would be able to complete all of the challenges, but life seems to have gotten in the way.  I did find time to work on a card last night, and was able to incorporate the elements of the challenge into the project.  

This thank you card was made for a specific purpose.  A few weeks ago, a very generous invitation was extended to my family.  A co-worker of my husband pilot's a hot air balloon and he extended an open invitation to us (and a lot of other families) to get upclose and personal with the balloon at a festival in Moline, IL.  We were able to make the drive and go to the festival, and we were the only family that went.  It was an amazing experience.  My boys, husband, and I were able to help set up and take down the balloon (it did not fly due to weather conditions).  So, I have been meaning to send a thank you card to the pilot and his wife who invited us. 

This challenge was the perfect opportunity to use my Pop up neighborhood cartridge (circle exclusive).  I hope you like it as much as I do.  EVERY cut is from the popup cart.  I even added a slidding mechinism that makes the balloon go up and down :)  In addition to the cartridge I also used CTMH stamps for the front and inside & CTMH inks to ink the edges and for the stamping. 


My boys during the set up process!


The balloon set up to "glow"


The "glow"


up

half way

down


Slider from the inside of the card.


Inside

October 9, 2011

Better Blogging day 9

Oh my goodness.  I can not believe that this is 9 days in a row for blog posts  LOL!  I think this might be a record for me.  Today is Sunday 10-9, and I am acutally away for the weekend with my family at a waterpark in Wisconsin.  So, I think it will be safe to say that I will not be posting tomorrow (unless I can do some crafting here- not likely)

Anyway, I have one final project to share in my line up.  This one is actually a continuation of the last few days of YUDU projects.  While I had the card shop set up for the front of the shirts, I decided to created a few custom cards for the friend who ordered the shirts.  I simply pulled the images onto some CTMH double sided paper and adheared the pulled image to the front of a card.  I used a zip strip (CTMH) to finish off the front-  Simple and cute.  I hope she likes them.  I made 3 cards, one to go with each of the shirts.


As I used an ink with a metalic shimmer, it was hard to get a good photo of the front, but I think you get the idea. 

October 8, 2011

Better Blogging Day 8


As yesterday's post was a bit picture heavy I decided to save some of the additional details for today.  I mentioned yesterday that I tried something a bit different with the front of the shirt.  I used a BLANK YUDU Cardshop screen (no machine required) to create the image on the front.  Like the rest of the images for this shirt the design work was done using Photoshop and SCAL.  I also cut the image from vinyl and applied the negative to the screen.  I found that using the card shop screen allowed for better control over image placement with such a small decal.  The best part was that I didn't even need the card shop frame.  I simply placed the screen over the shirt and pulled the image- so for those who do not own a YUDU or YUDU Cardshop, this would be a great way to make small custom designs- and the blank screens are under $20 for a two pack! 


October 7, 2011

Better Blogging Day 7

A friend asked me to design some t-shirts for her team at work.  All of the members of the team have a thing for penguins so she asked that I include them in the design.  A while ago, she emailed me some images that she had in mind.  I was able to work with those images and the "program that shall not be named" to design a double sided t-shirt design for her.  I'm so excited about the final results.  The design work was done in Photoshop, the converted to SVG and cut from vinyl using "the program that shall not be named" and my cricut.  The vinyl negative was then used and applied to a clean YUDU screen.  I know that there are many ways to use the YUDU, but I have found that Perminant Outdoor vinyl gives me the best and most consistant results.  For the shirt back designs I used my YUDU, but for the front I thought I would try something a little different.  Be sure to stop back tomorrow for more details on the front of the shirt :)


The design in SCAL


Image negatives in the vinyl.  I cut the names apart so that the screen was set up with the main design and I removed the name after I was finished with it, washed the screen, then applied the new name.  It took a fair amount of time to dry the screen between each shirt, but in the end I am very happy with the results.


Applying the vinyl to the YUDU SCREEN.


Pulling the screen.

October 6, 2011

Better blogger day 6

Mass production on thank you cards.  I needed a bunch of thank you cards last month so I spent an entire afternoon working them  I did quite a few, and found that I was able to simply reverse the design to get two totally different looks.  I love the way they turned out. 

To make these I used the CTMH AP cartridge, bling, craft CS for the base, and some CTMH stamps


October 5, 2011

Better blogger day 5

Today you get two cards for the price of one :)  I made two cards for friends last month.  One friend is having a baby, the other lost her Mother in law.  While the purpose behind each card is very different the format was very similar.  They were both made using a single sheet of 12x12 pattern paper for the front.  I am just amazed at how using different sections of the same paper and a very similar color scheme resulted in two very different cards.  Both cards used flowers cut with my cricut and the CTMH Art Philosophy Cartridge.  The second card also has a double mounted sentiment on the front- those shapes are also on the AP cart. 

******************************************************************************
CARD 1- for my expecting friend


*******************************************************************************
CARD 2- for my friend who lost her MIL