December 30, 2013

Baby shower with converse theme

Baby shower that my sister my mom and I threw a few weeks ago for my sister in law Kim who is expecting her first baby
The sign in table
Framed invitation favors and personalized onsie

The sign in table.  My mom made the shoes using a cut file from svgcuts.com
The indies


One of the shoes used to decorate the tables


December 29, 2013

You're retro

Just want to share a quick birthday card I made for my mother in law.  The camera and other images are from letteringdelights.com (retro camera graphics).  I designed the card from those images using the silhouette designer studio and print and cut features.   
I used a pop up card design so that the inside of the card stands up.  Love the finished product

December 9, 2013

Thank you Card for a Nurse


My third semester of nursing school is drawing to an end.  Infact, I have a final tomorrow (lets not dwell on that just now).  I wanted to make a thank you card for my instructor and give her a little thank you gift.  It can't be anything too over the top, I don't want to suck up- just say thank you.  I found this great Christmas ornament at Hobby Lobby and decided to design card around the ornament.  Sort of a 2 for 1 deal.  It is a card and a small gift all in one. 

The card was designed in silhouette studio.  I began by measuring the ornament, and finding a way to attach it to the card.  I used the product packaging for inspiration and attached the orament to the cardstock in a manner that was very similar to how it was in the original packaging. 
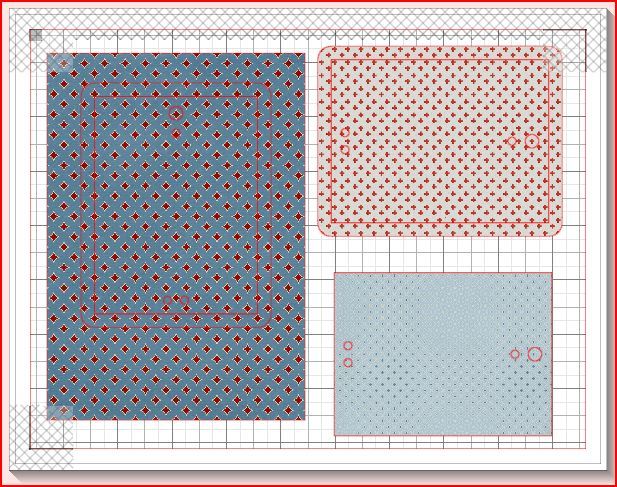
 
Card Front
 
The inspiration for this card came from the nurse ornament that I found at Hobby Lobby.  Here is a close up of the ornament.The patterns on the fron of the card were printed and then embossed with my cuttlebug and swiss dots embossing folder.  I stamped the thank you sentiment using CTMH stamps (but this could have been printed).
 
 
The card front design in silhouette studio (print and cut).  Only the outside edges and circles were cut on each layer.  I started by designing the smallest layer.  When I had the holes aligned properly, I copied the image, and added it to the next size rectangle (deselecting cut lines for the smaller insert) so that the holes would align perfectly for each layer.
 

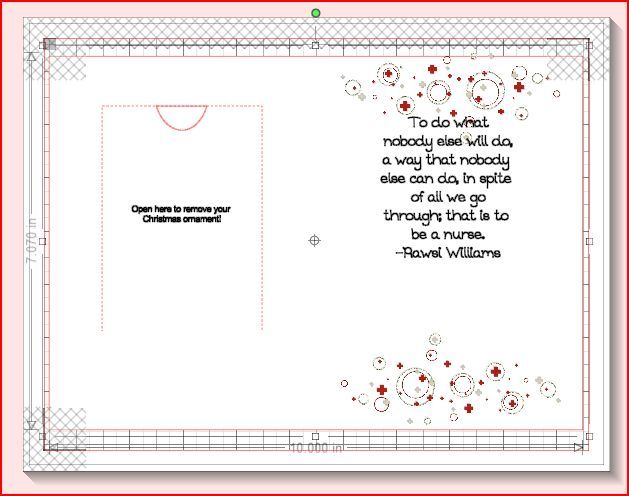
Inside the card as designed in Silhouette studio.  On the inside I created a perferated flap that can be opened to remove the ornament from the front of the card (brilliant right!?!)


Inside the card


Close up of the inside left where I have created a perferated flap that can be opened to remove the ornament (held on by twist ties).

November 21, 2013

Happy birthday to my minion

My son Blake turns seven this weekend. So today I have been working on his birthday treats for school.  A little bit of background.... The school my boy attend has gone to a healthy snacks only policy for daily snacks and birthday treats.  I have certainly had my challenges with this and trying to find a birthday treat that fit that was a pain in the butt.  So I took my inspiration from his class theme.  MINIONS!

Using my silhouette cameo I created stickers (print and cut ) for the minion eyes, overalls, teeth, and party hats.  I glued on googlie eyes and little puffy balls to finish them off.

Here are my minions helping me assemble the minions

Ian hard a work putting the stickers on the bananas


After finishing the bananas I made a quick birthday button and hat for my birthday boy.

November 9, 2013

Playing with winter cards


Last night I spent some time playing with holiday card ideas.  Now anyone who knows me knows that I do not actually send out home made holiday cards. I order fancy photo cards and send out pictures of my kids.  As much as I love crafting and creating I'm very self conscious about my art.  I really create thing s just for me.  I have boxes of ready to go cards that I may never use but I love the process :). 

This is such a simple and lovely card.  I used a CTMH stamp set from the current idea book for the image.  I embossed and inked up a mat layer to coordinate with the stamped image.  Matted the stamped layer on silver glitter paper and added a ribbon. So simple yet the finished look is beautiful .


This second card used a similar technique.  I used a CTMH stamp and this time used an embossing ink pad and red embossing powder.  I embossed a mat layer and inked it up to match.  Matted the stamped image on silver glitter card stock and added a ribbon to finish it off

The two cards have joint the others in my stash just waiting for the day the will get used.

Thanks for stopping by. 

Missie

Baby shower invites

I have been working on baby shower invites this week.  My brother and his wife are expecting their first baby soon and I'm so excited to help throw them a baby shower next month.  


A big thank you to my friend Kim Phillips who owns little bees graphics. She kindly designed the converse themed invites for me.  I just needed to print mat on black card stock and add some ribbon.  

Thank you


A quick thank you card I made for a nursing instructor

November 8, 2013

Snow White iPad decal

NJust sharing a quick project today.  I have been wanting to make this for a while and finally got it done today.  This is a vinyl decal I made for my iPad.  Not much detail to share but I wanted to post the photos


The photo in the upper left is the decal...bottom left with transfer tape on the iPad...right is on my iPad

October 31, 2013

Minnie shoes

Halloween shoes.  I found these shoes at goodwill for $5 and with a little craftiness turned them into perfect minnie mouse Halloween shoes
Paint with yellow acrylic paint.  It took 5 layers.  When the last layer is still wet dust with crystal glitter
Red ribbon bow.  Simple to make and attached with hot glue

Minnie Mouse shoes peaking out from below my dress.  I'll try to get a full photo later today to share

October 26, 2013

Quick birthday card

Just a quick post to share the birthday card I made for my hubby's birthday.  It is always a challenge to make masculine cards and I love the way this one turned out

September 9, 2013

Back to school 2013


Just a quick post tonight.  Things have been quite busy here getting ready for school. Today was the first day for my boys and I just had to share a quick photo. I can't wait to scrap these images :)

August 30, 2013

Card making day

I met up with a friend today for a card making day.  Nothing fancy but we did get a variety of cards made for each of us.  The papers are all CTMH and the stamps too


August 26, 2013

Thanks a minion

Tonight is the annual back to school picnic at my children's school.  As a member of our parent council (think PTA) I will be working to recruit volunteers and support for school PC events.  One of the many things we do is the box tops for education program. So as part of our display I made this cute BTFE collection box.  My sons teacher happens to be doing a minion theme this year so after tonight it will be donated to her classroom.  

I also made some stickers to hand out tonight for parents who volunteer for events. 


•note to create these items I used svg files that I found on okieladybug.com

Edited to add....I made a little buddy for my minion. Now I have one for each of my boys home room classes.


August 24, 2013

Creative inspiration


Nothing gets my creative mind working like a day when a big box of goodies arrives at my house via fed ex. Today my Close to my heart order arrived with all my goodies from the new fall/winter 2013 idea book.  I just had to rip open the box and start playing right away.  

This lovely home frame is part of a new kit from Close to My Heart.  It is called the designed decor frame it. It was so simple to make. I added a few stamps that I already had to the ones included with the kit, some chocolate ink,  adhesive and photos. That's it.  Simple assembly and it was done in about an hour. I didn't even have to use a die cut machine because the die cut photo frames were included in the kit.  This would be a great project for anyone!  As most of you know I am a CTMH consultant if you would like to purchase this kit you can do so at. Www.melissatodd.ctmh.com